
Pelvic floor training is an important aspect of women's and men's health. A weakened pelvic floor can lead to various problems, such as incontinence or prolapse. Pelvic floor training aids, such as cones with different weights, offer an effective method for targeted training of the pelvic floor.
How does strengthening the pelvic floor muscles with weights work?
The weights are specifically designed to strengthen the pelvic floor muscles. Regular training with these weights can improve pelvic floor muscle strength and endurance. The cones or balls are inserted vaginally and held in place by targeted contractions of the pelvic floor muscles. This training helps strengthen and tone these muscle groups.
Different weights offer the advantage of being individually adjusted to your training level. This allows you to gradually increase the intensity of your training. Start with a light weight and gradually increase it for consistent progress.
Regular pelvic floor exercises can lead to improved control over bladder and bowel function. It can also increase sexual sensitivity and improve support for internal organs.
How often should I train my pelvic floor muscles?
If you initially dedicate 10-15 minutes daily to the exercises and then wear the cones for another 10-15 minutes a few hours later, you should notice a significant improvement after a few weeks. By incorporating the exercises into your daily routine, you can even reduce the active training time.
This program is designed so that you can simply perform it as a complete exercise session, one after the other. Wear comfortable clothing and gather everything you need. Use the same cone for the exercises that you are currently using for carrying.
How does the training work?
perception
The better you feel your pelvic floor, the more effectively you'll practice—because you'll activate the right muscles. Women often tense their abdominal, gluteal, or thigh muscles, which unfortunately doesn't do the pelvic floor any good. If you tense your pelvic floor correctly and strongly, it's still a relatively small movement—and that's enough! The following exercises will help you precisely locate and become familiar with your body's "most secret" muscles.
Exercise 1: Blinking
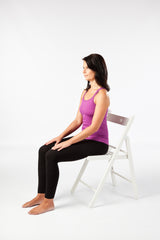
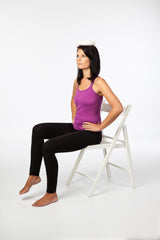
Position: Sit upright and relaxed like a queen (please don't arch your back) on the front half of the chair, legs hip-width apart. You should clearly feel your two sit bones on the surface.
Exercise 1: Blinking
Position: Sit upright and relaxed like a queen (please don't arch your back) on the front half of the chair, legs hip-width apart. You should clearly feel your two sit bones on the surface.
Exercise 1: Blinking
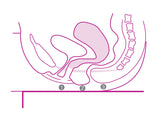
Now sit on the cone so that it rests outside your clothing in the positions indicated in the graphic. First, slide it under your vagina (1). Feel the pressure and blink several times at the cone with a small muscle movement. This should be completely invisible from the outside.
Does it almost feel like a grasping sensation? That's exactly right. Now push the cone further back so that it rests under the perineum (2). Try to move the ischial tuberosities a little toward the cone, pulling them together. Again, it's correct when the movement isn't noticeable from the outside. Finally, push the cone even further back so that it rests under the anus (3) and try blinking again and gently grasping.
Use your hands to control your glute muscles. If you can keep them still and still notice some movement inward around the cone, then you're already activating your pelvic floor very skillfully.
Exercise 1: Blinking
Now sit on the cone so that it rests outside your clothing in the positions indicated in the graphic. First, slide it under your vagina (1). Feel the pressure and blink several times at the cone with a small muscle movement. This should be completely invisible from the outside.
Does it almost feel like a grasping sensation? That's exactly right. Now push the cone further back so that it rests under the perineum (2). Try to move the ischial tuberosities a little toward the cone, pulling them together. Again, it's correct when the movement isn't noticeable from the outside. Finally, push the cone even further back so that it rests under the anus (3) and try blinking again and gently grasping.
Use your hands to control your glute muscles. If you can keep them still and still notice some movement inward around the cone, then you're already activating your pelvic floor very skillfully.
Exercise 2: Access
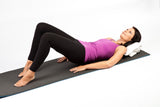
Position: Lie comfortably on your back with your upper body slightly elevated. Support your upper body with a firm pillow or on a sofa (not too soft, with a suitable backrest). Place your legs hip-width apart.
Exercise 2: Access
Position: Lie comfortably on your back with your upper body slightly elevated. Support your upper body with a firm pillow or on a sofa (not too soft, with a suitable backrest). Place your legs hip-width apart.
Exercise 2: Access
When you wear the cone normally, you need to push it inward until you can no longer feel it, as shown in the graphic. For this awareness exercise, we're intentionally doing it differently. Insert the cone only far enough so that it just disappears, and hold the frenulum in place. If you now gently tense your vaginal muscles, you should clearly feel the cone, as it sits exactly at the level of this muscle layer.
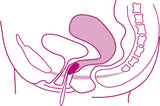
If you tense a little more forcefully, the cone will move with the muscle movement, perhaps even slipping out or being pulled in deeper. Try to grasp and move the cone as precisely as possible. Play with it by tensing it harder at times and then lightly at others. Your buttocks, thighs, and stomach remain completely still. Above all, be careful not to press with your abdominal muscles. The correct movement is very small and subtle. Once you've properly welcomed your "secret" muscle, push the cone so deeply into the vagina that you can no longer feel it and move on to the strength exercises.
It's a good idea to take enough time for the awareness exercises at the beginning. You should be undisturbed, awake, and relaxed, and able to give your pelvic floor full attention. Once you've gained a good feel for your strength base, you can shorten this initial training phase.
Strength building
Wearing the pelvic floor training aids normally primarily results in a holding effect, resulting in a more static muscle buildup. If you perform the exercises in this brochure regularly, you'll also gain a pulsating quality with powerful contractions and pleasant releases. This will result in a more holistic effect and a more comprehensive muscle buildup. You blinked and played around with the awareness exercises; with the strength exercises that follow, you can really work hard.
Let your breathing support you. It's best to tense on the exhalation and release on the inhalation. If you can't get this rhythm right away, be sure not to hold your breath and tense up. It's also beneficial to avoid sudden tensing, but rather to steadily increase your strength and then release slowly – much like a wave comes and goes.
ATTENTION, PLEASE NOTE:
If practicing is uncomfortable and exhausting for you, and you feel like "everything is pushing down" when you tense, then you're pushing too hard with your abdominal muscles. This isn't doing you any good! Try exerting less effort, only half as hard as you could, and try to "draw the power up from your pelvis." You're practicing correctly when you feel like "it's pulling up," that it's powerful yet somehow light at the same time, and you feel taller.
Exercise 3: Pelvic roll
Position: In a slightly elevated supine position, as in exercise 2.
1a) Soft pelvic roll: Grasp the fabric of your pants at the crotch. Inhale deeply and relaxed. As you exhale, roll your pelvis upwards: Let your back lengthen, as if it were trying to slide down toward your heels, and gently pull your pelvis toward you using the fabric of your pants. As you inhale, roll your pelvis back to the starting position. Repeat this rocking motion 10 times in rhythm with your breathing, still without any muscle tension. Your back will appreciate this exercise. Make sure you really lengthen your body when rolling, not shortening it! You'll barely feel the cones when doing the exercises lying down.
Exercise 3: Pelvic roll
Position: In a slightly elevated supine position, as in exercise 2.
1b) Powerful pelvic roll: Inhale deeply and relax. As you exhale, engage your pelvic floor, roll your pelvis upward, and simultaneously press your heels into the mat. Don't forget to lengthen your back! As you inhale, release the tension and lower your pelvis back to the starting position. Repeat this 10 times in rhythm with your breathing.
Exercise 4: Ball press
Position: In a slightly elevated supine position, as in exercises 2 and 3.
Exercise 4: Ball press
Position: In a slightly elevated supine position, as in exercises 2 and 3.
Exercise 4: Ball press
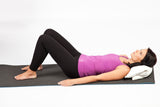
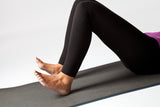
Breathe in deeply and relaxed. As you exhale, tighten your pelvic floor muscles and press down with the front half of your feet. This will lift your heels and pelvis slightly. You don't necessarily have to lift your heels into the air (as in the picture)—whichever feels better for you.
It's important not to arch your back! Your buttocks can contribute a little, but your stomach should not. You may feel like you're tightly enclosing the cone with your vagina and sitting bones. This is exactly right. As you inhale, release all tension, and your pelvis sinks back to its starting position.
Repeat this 10 times in rhythm with your breathing.
Exercise 4: Ball press
Breathe in deeply and relaxed. As you exhale, tighten your pelvic floor muscles and press down with the front half of your feet. This will lift your heels and pelvis slightly. You don't necessarily have to lift your heels into the air (as in the picture)—whichever feels better for you.
It's important not to arch your back! Your buttocks can contribute a little, but your stomach should not. You may feel like you're tightly enclosing the cone with your vagina and sitting bones. This is exactly right. As you inhale, release all tension, and your pelvis sinks back to its starting position.
Repeat this 10 times in rhythm with your breathing.
Tip: Always start and end your strength training program with the soft pelvic roll. Perform 10 powerful pelvic rolls and 10 ball presses, interspersed with 10 soft pelvic rolls. Alternating between intense contraction and gentle rocking is beneficial for muscle building.
Adopt it in everyday life
While you can think of the strength exercises as a kind of "weight training" for the pelvic floor, the following exercises are more about body coordination. You don't need to tense up too much; a good rhythm is more important. The pelvic floor training aids enhance the training effect. If you perform these exercises regularly, you'll learn to perform your normal everyday movements—for example, climbing stairs—more with your pelvic floor. This way, you'll train it without the need for cones and gain additional tone and vitality. The pelvic floor is the body's energy center, and if you keep it active through the right type of movement, you'll be more productive and in a good mood.
Exercise 5: Squatting Dance
Position: Sitting on a stool or a chair with straight, not too soft
Seat. 5 times right and 5 times left. Repeat the entire sequence 3 times. Then 20 times right and left, alternating.
Exercise 5: Squatting Dance
Position: Sitting on a stool or a chair with straight, not too soft
Seat. 5 times right and 5 times left. Repeat the entire sequence 3 times. Then 20 times right and left, alternating.
Exercise 5: Squatting Dance
Position: Sitting on a stool or a chair with straight, not too soft
Seat.
5 times right and 5 times left. Repeat the entire sequence 3 times. Then alternate right and left 20 times.
Exercise 5: Squatting Dance
Position: Sitting on a stool or a chair with straight, not too soft
Seat.
5 times right and 5 times left. Repeat the entire sequence 3 times. Then alternate right and left 20 times.
Exercise 5: Squatting Dance
Place a pillow, or better yet, a cherry pit bag, on your head. This will help you stay upright during this exercise and prevent your upper body from swaying.
As you exhale, tighten your pelvic floor and slowly lift your right leg slightly off the floor. It would be easy to lift your leg by shifting your weight, tilting your torso to the left. Resist this temptation and draw the strength to lift your leg from your pelvis. It's helpful to press your left foot gently into the floor and rotate your left shoulder slightly forward.
Imagine growing a little bit every time you tighten your pelvic floor and lift your foot.
As you inhale, slowly and carefully lower your foot back down.
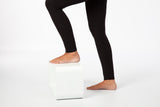
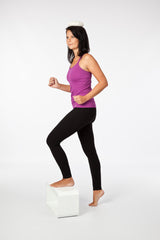
Exercise 6: Stair Stepping
Position: Standing in front of a step or a low, secure elevation
Exercise 6: Stair Stepping
Position: Standing in front of a step or a low, secure elevation
Exercise 6: Stair Stepping
Place the cherry pit bag on your head again so you stay tall like a queen and don't swing your upper body back and forth. Place your right foot on the stair step.
As you exhale, tighten your pelvic floor and slowly shift your weight completely onto your right leg until your left foot is only touching the floor with your toes. Draw plenty of strength from your pelvis—although your thigh is obviously very active here—and grow a little bit. As you inhale, shift your weight back onto your left foot and lower it.
Exercise 6: Stair Stepping
Position: 5 times right and 5 times left.
Repeat the whole sequence 3 times.
If you practice on a staircase, then walk up the entire flight of stairs slowly and with concentration.
Exercise 6: Stair Stepping
Position: 5 times right and 5 times left.
Repeat the whole sequence 3 times.
If you practice on a staircase, then walk up the entire flight of stairs slowly and with concentration.
relaxation
This is more important than you might think. In order for the body to rebuild muscles after exercise, they need a strong blood flow and thus a supply of nutrients. This is most effectively achieved through relaxation.
Relaxation exercise 1: Pleasant stretching
Just do it like a dog or cat: Stretch your arms, legs, and back thoroughly and enjoyably. Let your body decide what feels good.
Relaxation exercise 2: Inner reflection
Cuddle up in the most comfortable position and place your hands on your lower abdomen. Visualize your pelvic floor and internal organs as clearly as possible. Body awareness has been proven to increase the effectiveness of muscle-building exercises.
Imagine yourself sinking comfortably into the mat. Hum a low tone or sigh as you exhale. Allow this part of your body to
To be trusted in a loving way. Is it tingling or buzzing down there? Wonderful!
Relaxation exercise 3: Warming deep relaxation
Place a hot water bottle or a warm cherry stone bag on your lower abdomen. There's hardly anything better for letting go, and besides, you deserve a feel-good reward.
Our products for pelvic floor training
Pelvic floor training with weights
To the product
Pelvic floor training with seat cushion
To the product
Pelvic floor training with the Pilates ring
To the product
Recommendations last but not least
A tip for wearing the ELANEE pelvic floor training aids Phase I active – the more you move, the more comfortable it is for you. Unfortunately, when standing or sitting, the pelvic floor muscles tend to relax. While wearing the cones, they contract reflexively to prevent slipping, this constant tension can lead to
This can lead to slight cramping. This is often the reason why women don't feel comfortable with the cones. However, when you move, wearing the cones becomes an internal massage.
Here are some recommendations for your everyday life. Staying active and maintaining good posture will definitely benefit your pelvic floor, whether you're wearing the cones or not.
- If you have to stand for a long time, whether ironing or doing another task, it is good to adopt the stride position.
- Avoid rounding your knees when bending. Instead, bend your knees in a stride position and bend down with your upper body straight.
- If you're standing in line for a long time, you can slowly and invisibly shift your weight from one leg to the other, thereby doing something for your pelvic floor at the same time.
You can find more tips and exercises for an active body base in my books. And now, I wish you pleasant and successful exercises for your lasting pelvic floor health!
Your Irene Lang-Reeves
Always seek medical advice
Important note: This article contains only general information and should not be used for self-diagnosis or treatment. It is not a substitute for a consultation with a doctor.
Products from the field of pelvic floor training


More articles

What is the pelvic floor?
The pelvic floor is a kind of plate made up of three layers of muscle and connective tissue. Roughly the size of a hand, elastic and flat, it is located...
Read more

Pelvic floor muscle recovery – what, when, how much?
I've been a midwife for twelve years and have accompanied many women through pregnancy, childbirth, and the postpartum period. Almost all of them take a postnatal exercise class—after all, it's...
Read more

Pelvic floor muscles goodbye – insights into pelvic floor training after pregnancy
My name is Tanja, I'm 31 years old and a recent mother of two. With the onset of my first pregnancy, I first began to think about the topic of...
Read more